How to create buttons in Jupyter
Interact with your functions clicking buttons in Jupyter notebooks.

Source: Owen Beard on Unsplash
I really like Jupyter Notebooks. Whenever I’m using one, I have the feeling of it being basically an interactive spell book: able to display text, images, videos, including math formulas and code, and create an inner environment with your variables and functions. Compared to carving stones with your notes, this tool makes you feel like you are in the future.

Source: Giphy
And there is still an interesting aspect of notebooks that I haven’t mentioned: you can also actively interact with your notebook by directly manipulating widgets and allowing specific type of user-computer interactions. Let’s see how we can do this using ipywidgets, a very cool package with all the tools you need to build a simple GUI.
Installation
Let’s start by installing and enabling the package executing the following code in your terminal.
pip install ipywidgets
jupyter nbextension enable --py widgetsnbextension
If you are working with Jupyter Lab: you will need to install node.js and enable it using a different command:
jupyter labextension install @jupyter-widgets/jupyterlab-manager
Before we start, it is important to draw a distinction between two types of widgets:
- Some of them support interaction with the user, for example text windows, buttons and checkboxes.
- While others act as containers grouping widgets together, for example boxes, panels and tabs.
Creating widgets
Now that we have the package installed, we can immediately instantiate any widget in our notebook. You can click here to review the list of currently available widgets along the code to initialize them. Let’s see some examples defining some widgets:
# some handy functions to use along widgets
from IPython.display import display, Markdown, clear_output
# widget packages
import ipywidgets as widgets
# defining some widgets
text = widgets.Text(
       value='My Text',
       description='Title', )
calendar = widgets.DatePicker(
           description='Select Date')
slider = widgets.FloatSlider(
         value=1,
         min=0,
         max=10.0,
         step=0.1,)
menu = widgets.Dropdown(
       options=['red', 'blue', 'green'],
       value='red',
       description='Color:')
checkbox = widgets.Checkbox(
           description='Check to invert',)
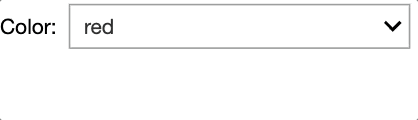
As shown above (and in most cases), initializing widgets involves calling a simple function and specifying some self explanatory arguments, it is really very straightforward. Here we defined a dropdown menu, a slider, a checkbox , a text window and a calendar in our notebook. You can display any of them by calling the object on a cell:
menu
But in order to display them altogether we need to use a container widget.
Creating containers
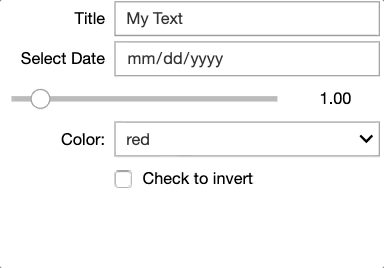
The most common ones are defined using the functions VBox and HBox and serve to display our widgets vertically or horizontally respectively. They expect a single argument: a list of widgets.
box = widgets.VBox([text, slider, menu, calendar, checkbox ]) box
Because the VBox and HBox containers are also widgets, we can use them inside one another. Let’s see a dummy example:

Figure: Our VBox container is now displayed two times horizontally using HBox
Alternatively, we can use another type of container on top. Let’s see the Tab container. While slightly more complex, it helps us better use space:
# defining a list with the contents of our windows
children = [box, box]
# initializing a tab
tab = widgets.Tab()
# setting the tab windows
tab.children = children
# changing the title of the first and second window
tab.set_title(0, 'box')
tab.set_title(1, 'copy of box')
tab

Figure: Your caption text here
Widgets hold attributes
Now that we know how to instantiate and layout our widgets, it’s really important to have in mind that each of these widgets is defined as an object and holds its own attributes. You could say that each widget has its own set of nuances, for example menu has an attribute called options :
menu.options

Figure: A tuple of defined options
Redefining this attribute would change the current options of our widget.
menu.options=('red', 'blue', 'green', 'black')
menu

With the exception of the containers, an attribute common among all the widgets that we defined above is value and might well be the most useful one. It means exactly what it should: calling it it returns the current value of the widget.
# current value of text, checkbox and calendar
print('Widget text has value {}, of {}'.format(text.value, type(text.value)))
print('Widget checkbox has value {}, of {}'.format(checkbox.value, type(checkbox.value)))
print('Widget calendar has value {}, of {}'.format(calendar.value, type(calendar.value)))

Being able to retrieve the value of our widget is what really allows you to make them interact with your code. Let’s see a dummy example using menu.
# We'll use the value of menu to display a plot and its title
import matplotlib.pyplot as plt
plt.plot([1,2,3], color = menu.value)
plt.title('A {} line'.format(menu.value))
plt.show()

Changing the value of our menuwidget and re-executing the code above will change the title and color of the line. We can do this because the options of menu correspond to valid values for the argument color of plt.plot.
This highlights a useful property of widgets: you can use them to control stuff without having to explicitly type it out.
Creating Buttons
You may have noticed that all we’ve done above involves clicking on the widgets and selecting stuff. But to be able to actually trigger something we’ve been executing lines of code. We need a widget able to trigger a response and execute code, we need the power of the button.
Instantiating a button resembles how we’ve been defining widgets:
button = widgets.Button(description='My Button')

Nothing happens...
But in order to make our button functional we also need to define what happens when we press it. In simple terms this is achieved by:
- Defining an Output widget that displays the response.
- Defining a function to be executed.
- Linking our button, the Output and the function together.
Here is a little snippet I use all the time when creating a new button: this will be the template for our examples.
button = widgets.Button(description='My Button')
out = widgets.Output()
def on_button_clicked(_):
      # "linking function with output"
      with out:
          # what happens when we press the button
          clear_output()
          print('Something happens!')
# linking button and function together using a button's method
button.on_click(on_button_clicked)
# displaying button and its output together
widgets.VBox([button,out])
The function clear_output refreshes our display every time our button is pressed. If we omit this function, pressing the button several times would print ‘Something happens!’ several times, which seems undesirable. The Output widget is really an interesting one: we can use it to display print statements (as we did above), plots, videos, images and basically
anything which displays nicely in a Jupyter notebook will also display well in the Output widget.
Let’s see a trivial example of how we can use it to display Markdown.
from IPython.display import Markdown
# Using output to display Markdown
markdown_out = widgets.Output()
with markdown_out:
    display(Markdown('Slider value is ${}$'.format(slider.value)))
markdown_out

Using Markdown to display the value of the widget
Notice that we are rendering the value of the slider as a mathematical expression by surrounding the placeholder with $ symbols.
Examples
Now that we had an overview of how to define, organize and use various widgets, we’ve seen all the tools we need to assemble something cool. Let’ see a couple of practical examples! Make sure to copy paste these into your notebooks to see the widgets in action.
Exploring global variables
Some people like to easily see what variables are defined in your working environment. Let’s make a little help for this. We will make a menu to select an option from our global variables, hitting the button will check its type and print it.
- Line 4: using globals we get the list of all the global variables defined in our scope.
- We exclude variables with underscores and use the rest as options for our menu (line 12).
- We create a button, output and a function where we print the type of selected variable (lines 14–20).
- Link the button and its function together (line 22), and display a container with our widgets (line 24).
# global_explorer.py
a, b = 1, 5
# selecting global variables without underscores
global_variables = list(globals().keys())
funcs = []
for i in global_variables:
    if '_' not in i:
        funcs.append(i)

# creating menu with them
global_vars = widgets.Dropdown(
    options=funcs)
# button, output, function and linkage
butt = widgets.Button(description='Print Variable')
outt = widgets.Output()
def on_butt_clicked(b):
    with outt:
        clear_output()
        print(type(globals()[global_vars.value]))
        print(globals()[global_vars.value])

butt.on_click(on_butt_clicked)
# display
widgets.VBox([global_vars,butt,outt])

We made use of the button snippet
Exploring a dataset
Let’s have another demonstration of what you can do to explore a dataset using again a menu and a button. We’ll use the menu users to select a specific value, pressing the button will calculate various insights from the dataset according to it and display the results using Markdown.
- At line 8 we define our menu users with the unique values of our column df['Users'] as options.
- In lines 16, 17 and 18 we define a button, an output and a function. The function will make use of users.value to subset our dataset and compute some variables.
- These are passed inside placeholders in string (lines 40–48). At line 50 we link our button with the function with the button method .on_click().
- At line 52 we finally display our menu, button and output inside the containerVBox.
# data_explorer.pt
import pandas as pd
import math
import ipywidgets as widgets
from IPython.display import display, clear_output, Markdown
df = pd.read_csv('https://raw.githubusercontent.com/diegopenilla/Some_Data/master/Downloads/trainingData.csv')

# DROPDOWN MENU FOR SELECTING USER-ID
users = widgets.Dropdown(
    options=list(set(df['USERID'])),
    value=1,
    description='USER-ID:',
    disabled=False)

dicti = {} # Initialize dictionary for holding {building(s): floor(s)} for each user.
# Button to display info about user
buttonuser_info = widgets.Button(description='Show Info')
outuser_info = widgets.Output()
def on_buttonuser_info_clicked(b):
    with outuser_info:
        clear_output()
        selection = df[df['USERID']==users.value]
        visited_places = len(set(selection['SPACEID']))
        dicti = {i: 0 for i in list(set(selection['BUILDINGID']))}
        for key, val in dicti.items():
            dicti[key] = list(set(df.loc[(df["USERID"] ==users.value) & (df["BUILDINGID"] == key), "FLOOR"]))
        # Extract distance travelled
        lat = list(selection["LATITUDE"])
        long = list(selection["LONGITUDE"])
        # Calculate distance between one point and the next
        total = []
        for latitude, longitude in zip(lat, long):
            total.append((latitude, longitude))
        rez = []
        # computing distance as the distance between the coordinates x,y from one point to the next.
        # (we sorted our dataframe by time, and now we are accesing data from a user)
        for i in range(len(total)-1):
            rez.append(math.hypot(total[i+1][0] - total[i][0], total[i+1][1] - total[i][1]))
        distance_travelled = sum(rez)
        # display, the information in Markdown to make it look better.
        display(Markdown('''For User {}, there are ${}$ observations from ${}$ WAP (*Wireless Access Points*)
- Beginning in {} and ending in {}
- Using smartphone {}
- The user travelled {:.2f} $m$ (does not take into account vertical movemement, change of floors)
- Visited places {}
- In {} locations with different SPACEID'''.format(users.value, selection.shape[0], selection.shape[1]-9,
                                                   str(selection['TIMESTAMP'].min()), str(selection['TIMESTAMP'].max()),
                                                   str(list(set(selection['PHONEID']))[0]), distance_travelled,
                                                   str(dicti),len(set(selection['SPACEID'])))))
# Links button: buttonuser_info to its output function
buttonuser_info.on_click(on_buttonuser_info_clicked)
# Display
display(widgets.VBox([users,buttonuser_info, outuser_info]))

Figure: The widgets don’t do anything by themselves, so you do have to write a bit of code to get somewhere. This example allows an intuitive way of visualizing and sharing findings in the data: it returns a list of observations.
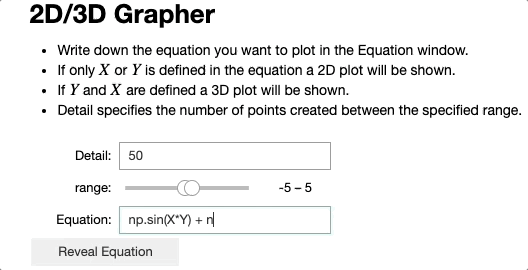
2D/3D Grapher
Turns up you can also display HTML inside a notebook, so let’s see a demonstration assembling widgets to make a grapher for mathematical expressions using Graph3d (a Javascript library) and matplotlib.
We will be calling the value of a text window (equation) inside the function exec, which executes python code as a string. Each time we press the button, we compute points for our graph by executing what’s inside of equation.value as python code. (I understand that there might be a better way to do this).

Figure: 2D Graph
Typing either X or Y in the equation text box will make a plot in two dimensions. If we enter both X and Y it will display a 3D plot.

3D Graph
Here we are using the same steps as before: we define a button, an output and a function (which uses the values of our other widgets) and link them together. This is the key thing you need to remember if you want to use buttons to interact with your code. Hopefully this is now clear enough.
Here is the code I used to do it:
from IPython.core.display import display, HTML, Markdown, clear_output
import json
import numpy as np
import matplotlib.pyplot as plt
import ipywidgets as widgets

# Defining Widgets:
equation = widgets.Text(
            value='np.sin(X*Y)+np.cos(X+Y)',
            placeholder='Type something',
            description='Equation:')
range_ = widgets.FloatRangeSlider(
    value=[-5, 5],
    min=-100,
    step=0.1,
    description='range:',
    orientation='horizontal',
    readout=True,
    readout_format='d',)
points = widgets.IntText(
    value=50,
    description='Detail:')

# DEFINING FUNCTIONS
def plot2D(x_points):
    # I find where the letter X is in my equation text and replace by placeholders {}
    number_of_placeholders = equation.value.count('X')
    decomposed_equation = equation.value.replace('X', '{}')
    y = []
    for point in x_points:
        dicti = {i: point for i in range(number_of_placeholders)}
        decomposed_eq = decomposed_equation.format(*dicti.values())
        # WARNING: couldn't figure out any other way, let me know if you know
        exec("""global res
res = {}""".format(decomposed_eq))
        y.append(res)
    plt.plot(x_points, y)
    plt.show()

def plot3D(X, Y, Z):
    options = {
        "width": "100%",
        "style": "surface",
        "showPerspective": True,
        "showGrid": True,
        "showShadow": True,
        "keepAspectRatio": False,
        "height": "600px"}
     # LOADING DATA
    data = [ {"x": X[y,x],
              "y": Y[y,x],
              "z": Z[y,x]} for y in range(Y.shape[0]) for x in range(Y.shape[1]) ]
    visual_code = r"""
       <link href="https://cdnjs.cloudflare.com/ajax/libs/vis/4.21.0/vis.min.css" type="text/css" rel="stylesheet" />
       <script src="https://cdnjs.cloudflare.com/ajax/libs/vis/4.21.0/vis.min.js"></script>
       <div id="pos" style="top:0px;left:0px;position:absolute;"></div>
       <div id="visualization"></div>
       <script type="text/javascript">
        var data = new vis.DataSet();
        data.add(""" + json.dumps(data) + """);
        var options = """ + json.dumps(options) + """;
        var container = document.getElementById("visualization");
        var graph3d = new vis.Graph3d(container, data, options);
        // setting the camera position initial
        graph3d.setCameraPosition({horizontal:0.8197963, vertical:0.945, distance:1.988})
        graph3d.on("cameraPositionChange", function(evt)
        {
            elem = document.getElementById("pos");
            elem.innerHTML = "Horizontal: " + evt.horizontal + "<br>Vertical: " + evt.vertical + "<br>Camera Distance: " + evt.distance;
        });
       </script>
    """
    html= "<iframe srcdoc='"+visual_code+"' width='75%' height='600px' style='border:10;' scrolling='no'> </iframe>"
    display(HTML(html))

# CREATING BUTTON
# if X and Y are inside equation.value we run plot3D
# otherwise we run plot2D

button = widgets.Button(description='Reveal Equation')
out = widgets.Output()
def on_button_clicked(b):
    global X, Y
    with out:
        clear_output()
        # computing the x points to evaluate our function
        x_points = np.linspace(range_.value[0],
            range_.value[1], points.value)
        X, Y = np.meshgrid(x_points, x_points)
        # WARNING: couldn't figure out any other way, let me know if you know
        exec("""global Z
Z = {}
""".format(equation.value))
        if 'Y' in equation.value and 'X' in equation.value:
            plot3D(X,Y,Z)
        elif 'Y' in equation.value:
            equation.value = equation.value.replace('Y', 'X')
            plot2D(x_points)
        else:
            plot2D(x_points)
button.on_click(on_button_clicked)
info = Markdown("""# 2D/3D Grapher
- Write down the equation you want to plot in the Equation window.
- If only $X$ or $Y$ is defined in the equation a 2D plot will be shown.
- If $Y$ and $X$ are defined a 3D plot will be shown.
- Detail specifies the number of points created between the specified range.""")
grapher = widgets.VBox([points, range_,  equation, button, out])
display(info, grapher)
Reusing your GUIs
After you’ve been through the effort of assembling a GUI, you would like to be able to invoke it whenever you need to. There is a quick way for you to call your widgets for aid using %run,(a built-in magic command from Jupyter. You can use this to execute the code of other notebooks in the environment of your current notebook without any effort, this is very handy.
Assume that long ago you defined some widgets in a file called math_widgets.ipynb and you would like to call them in your current notebook. All you have to do is to call the magic command specifying the path of the file:
%run math_widgets.ipynb

How it feels to call your widgets to help you out with a manual and repetitive task :)
Conclusions
- Adding widgets to your notebooks allows you to act as mediator between the code and the output by interacting with the variables.
- It’s particularly well suited to explore things and dynamically change function calls.
- It might also not always be the most productive thing to do.
That’s it, I hope this tutorial encourages you to start creating and using widgets in your notebooks!